ZK Attendance Management V5.0 Software Usage
Search1. Select the Employee section to enter employee information
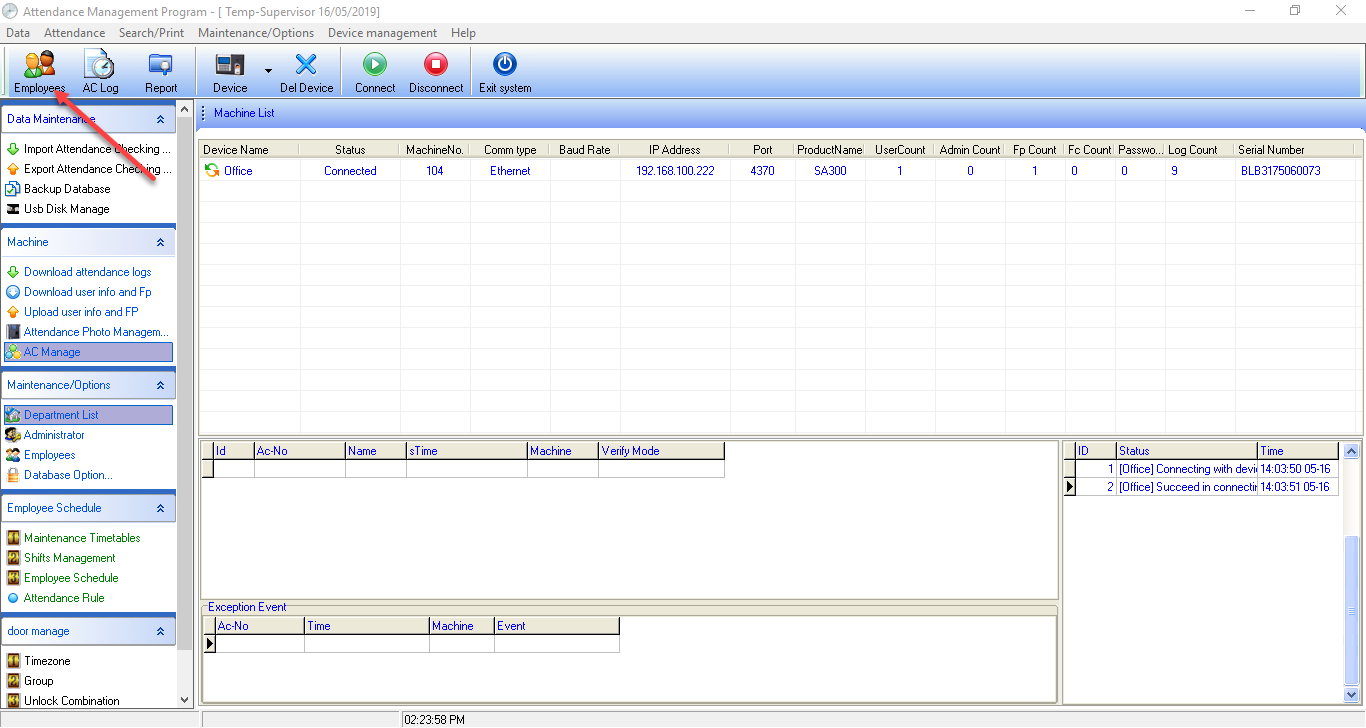
2. Select the employee whose details you want to edit. The red box will display the details that can be edited for the employee such as name, gender, photo, and date of birth
Note: AC No. must not be edited under any circumstances
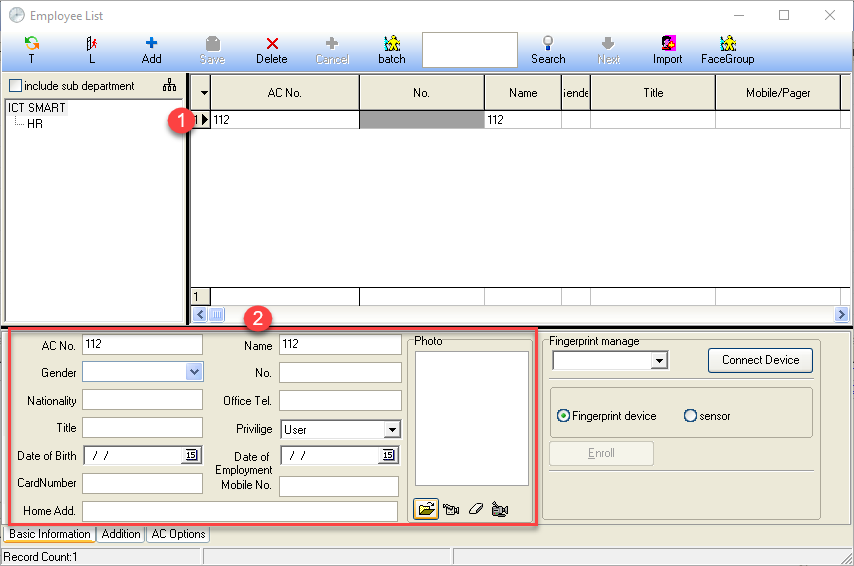
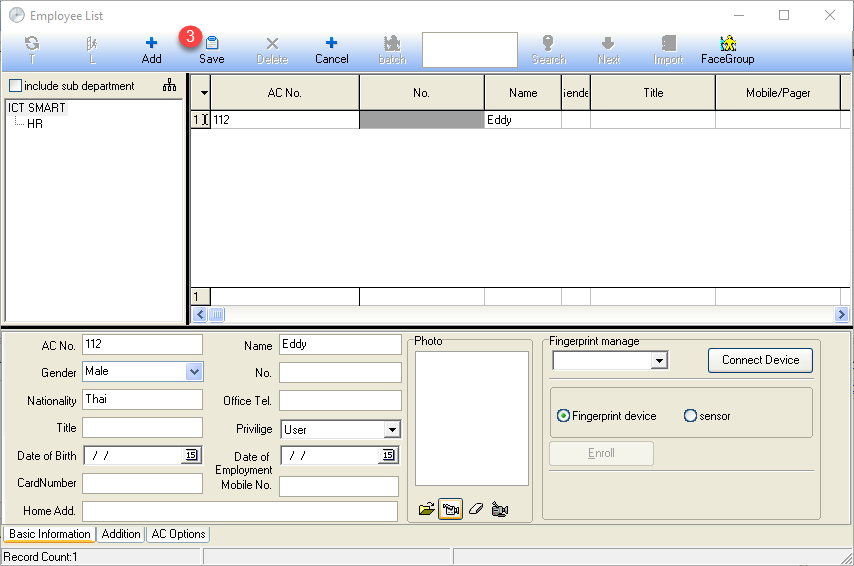
3. Complete entering the employee details and click the SAVE button
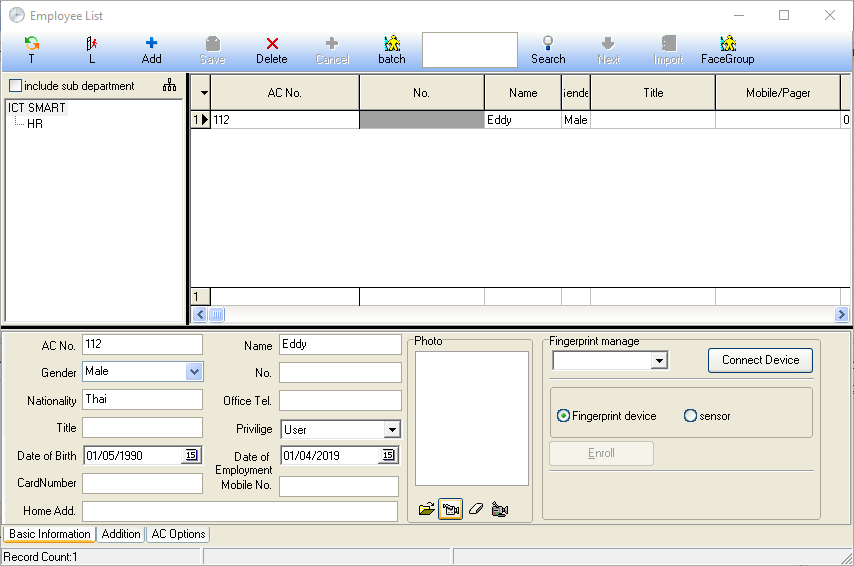
Employee details are displayed on the menu page
1. Select the Maintenance/Option > System Options topic to enter Software settings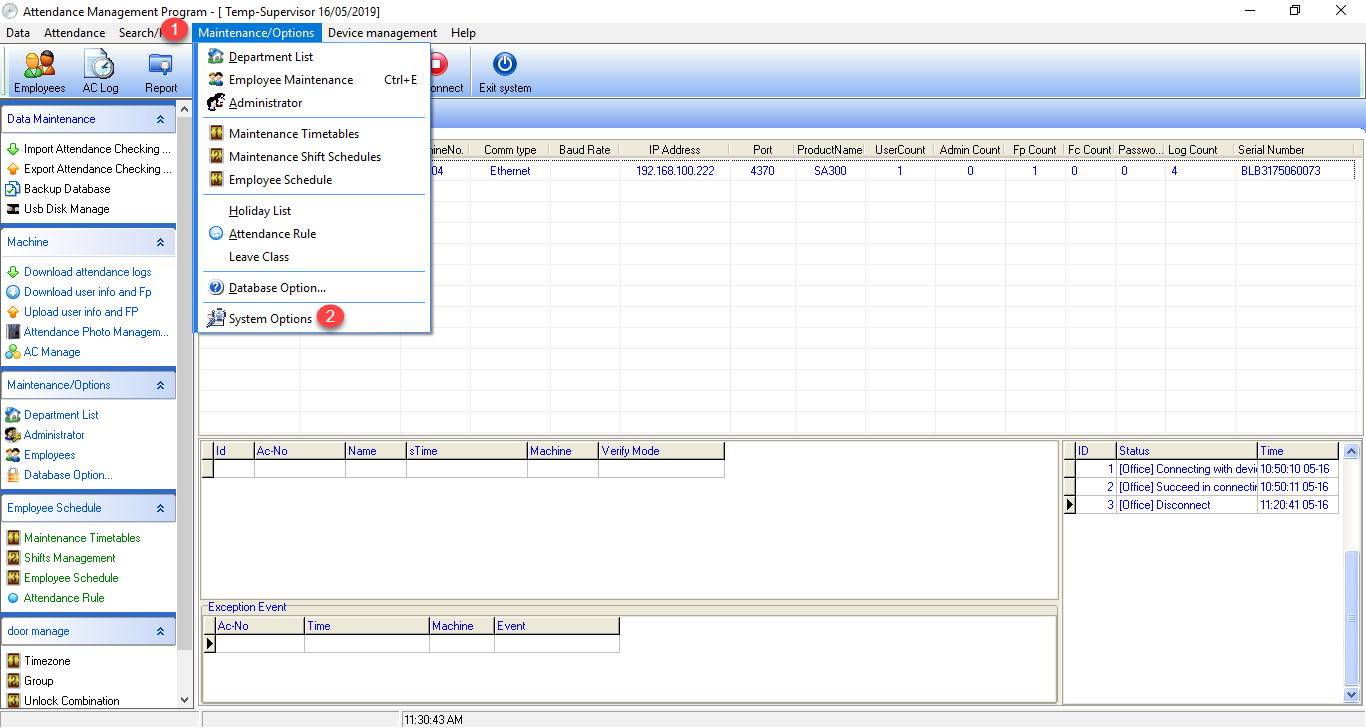
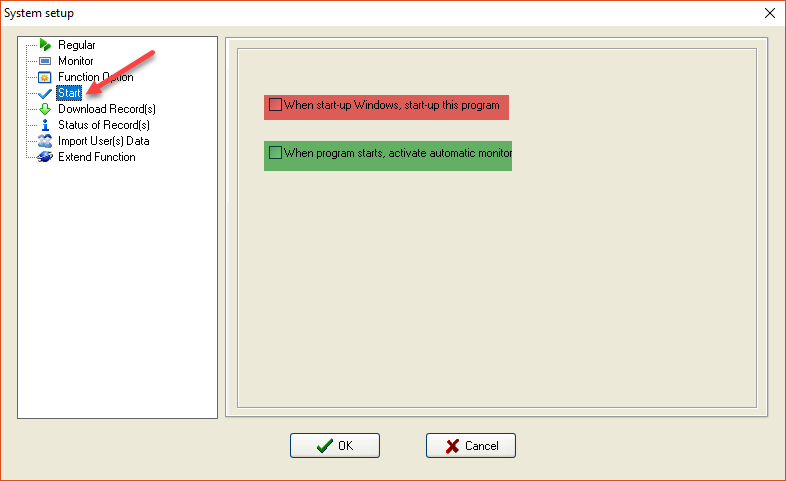
2. Select the Start topic, the system will display the configuration details of 2 topics as follows
1. Red box is when you turn on the computer, open the Attendance Management program
2. Green box is when you enter the Attendance Management program, connect to the device automatically
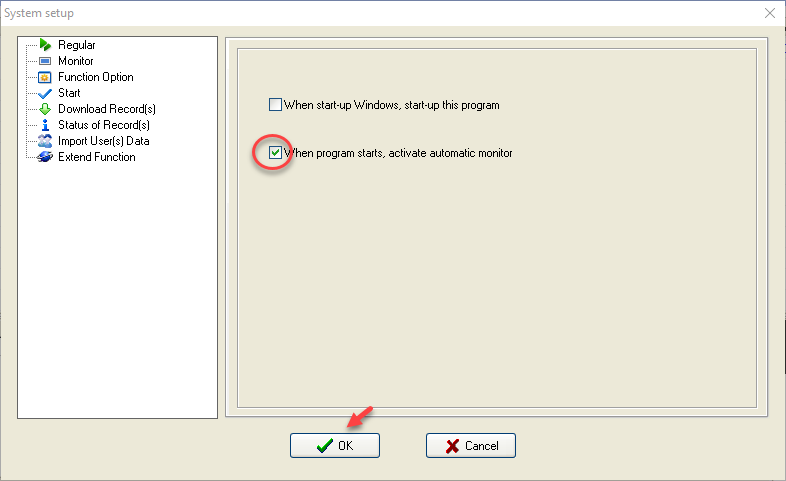
3. Check the checkmark next to When program starts, activate automatic monitor so that every time the program is opened, the software will automatically connect to the device
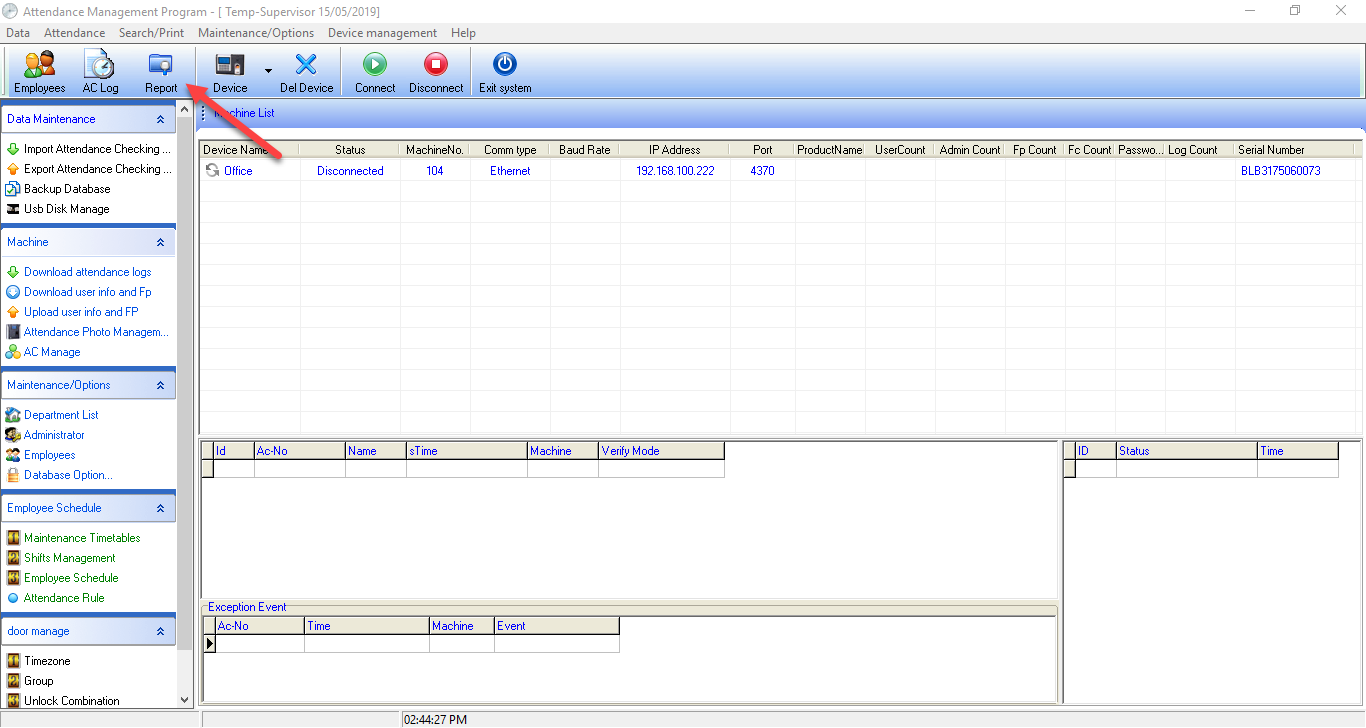
Select from the Report menu
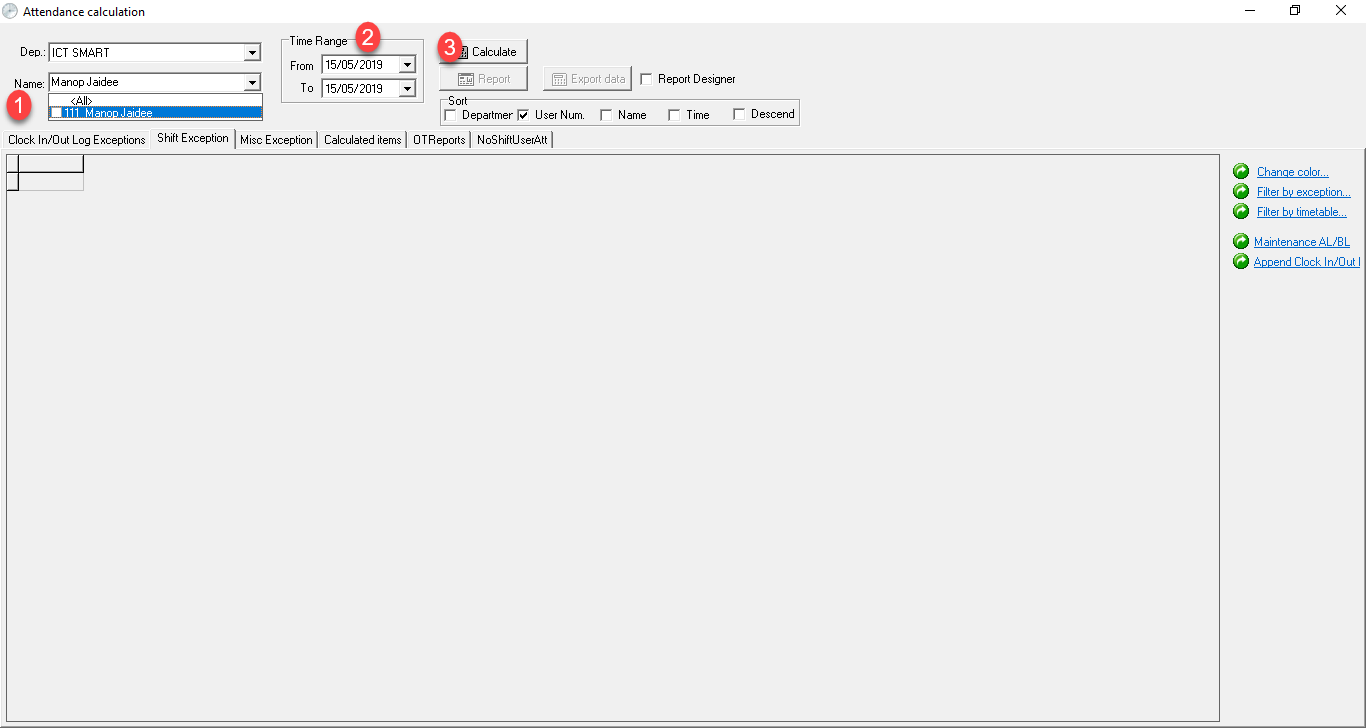
1. Select the employee list 2. Select the date that the time entry was forgotten 3. Calculate to verify
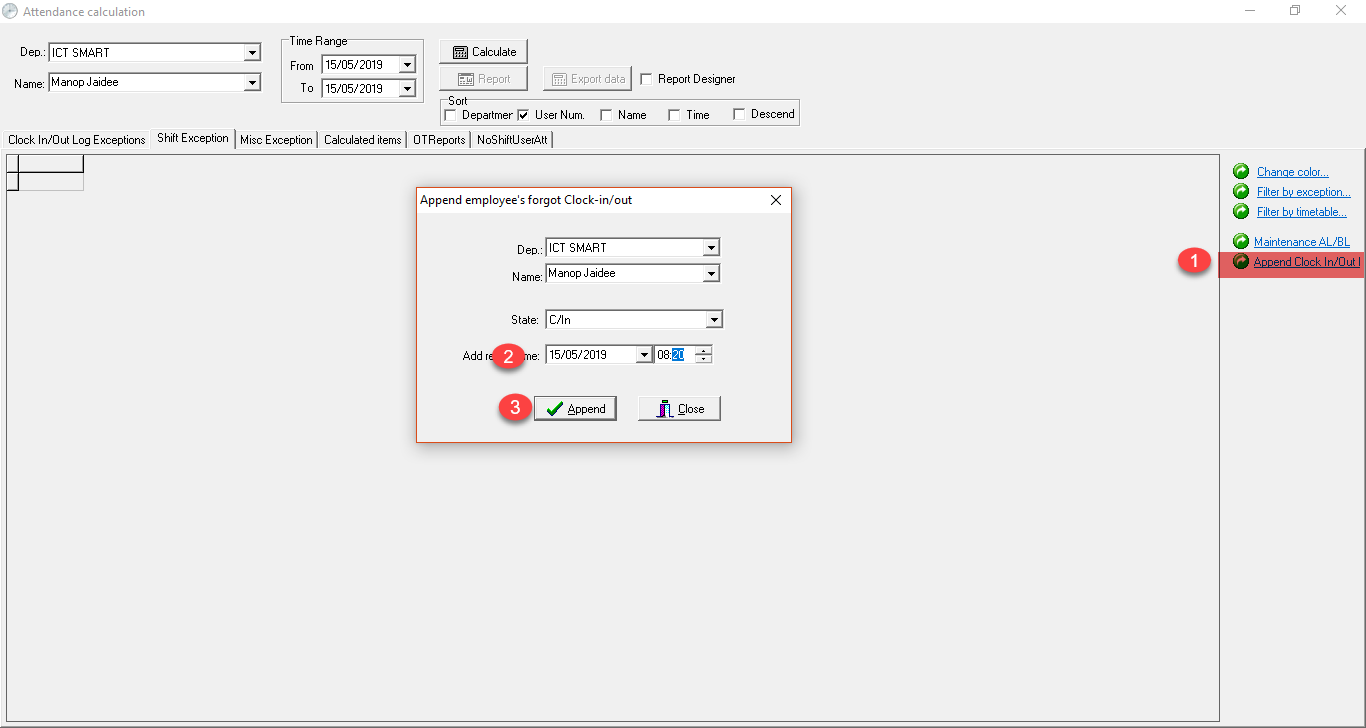
1. Select the Append Clock In/Out menu to enter time data 2. Select the time period 3. Press the Append button to confirm
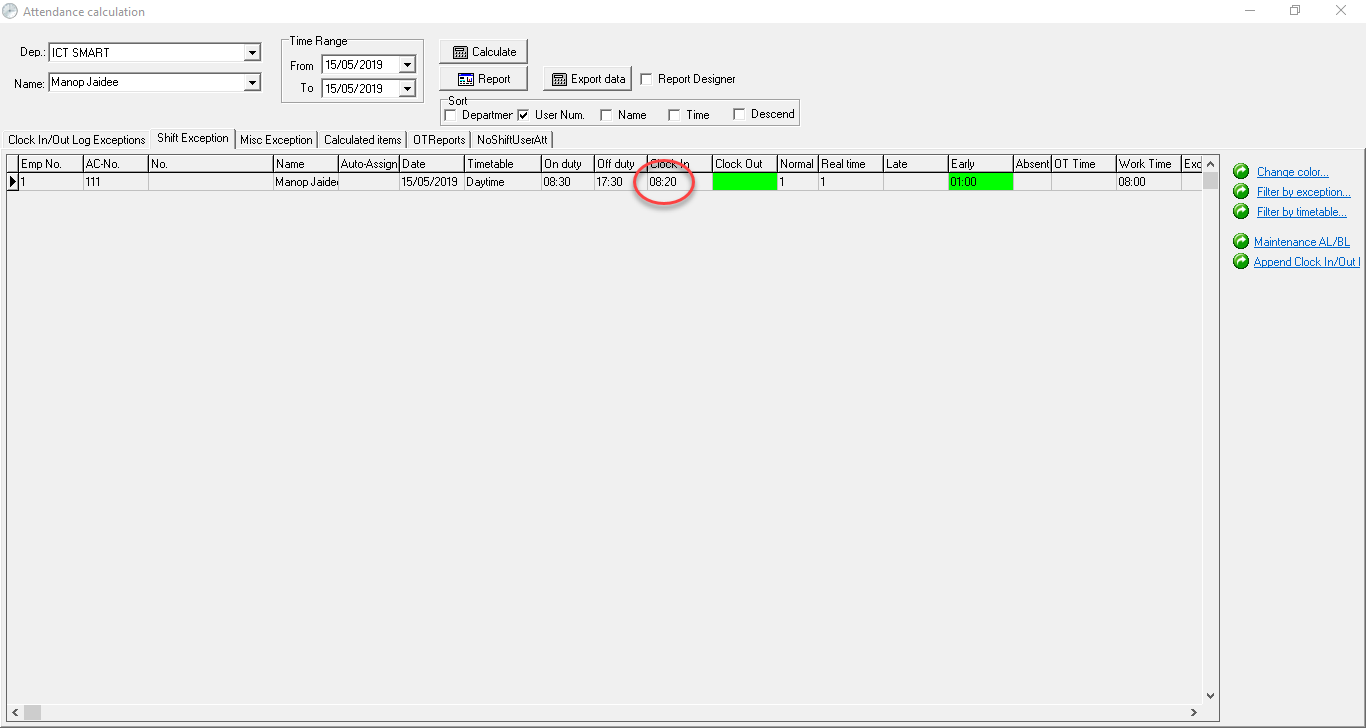
When the settings are complete, the data will appear according to the settings
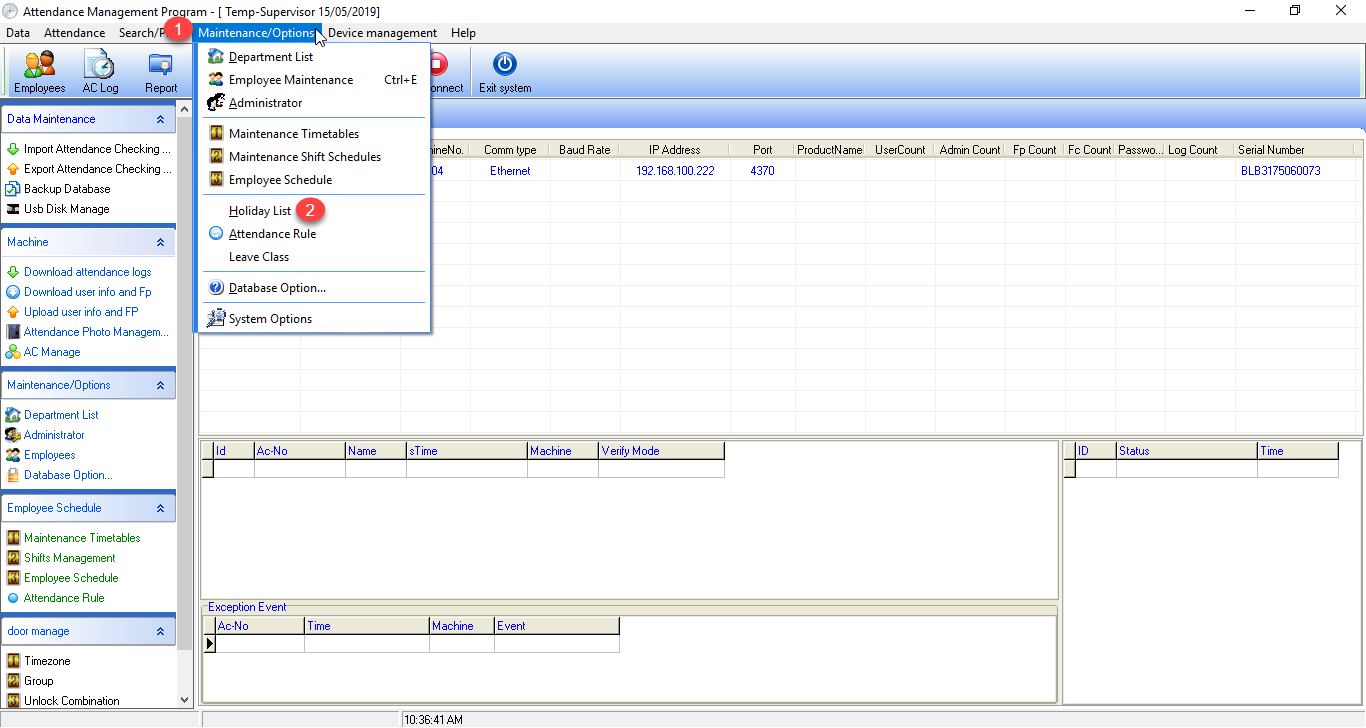
1. Click on the Maintenance/Option > Holiday menu to set the company holiday dates
The program will display the holiday setting window. Click the + button to set a holiday
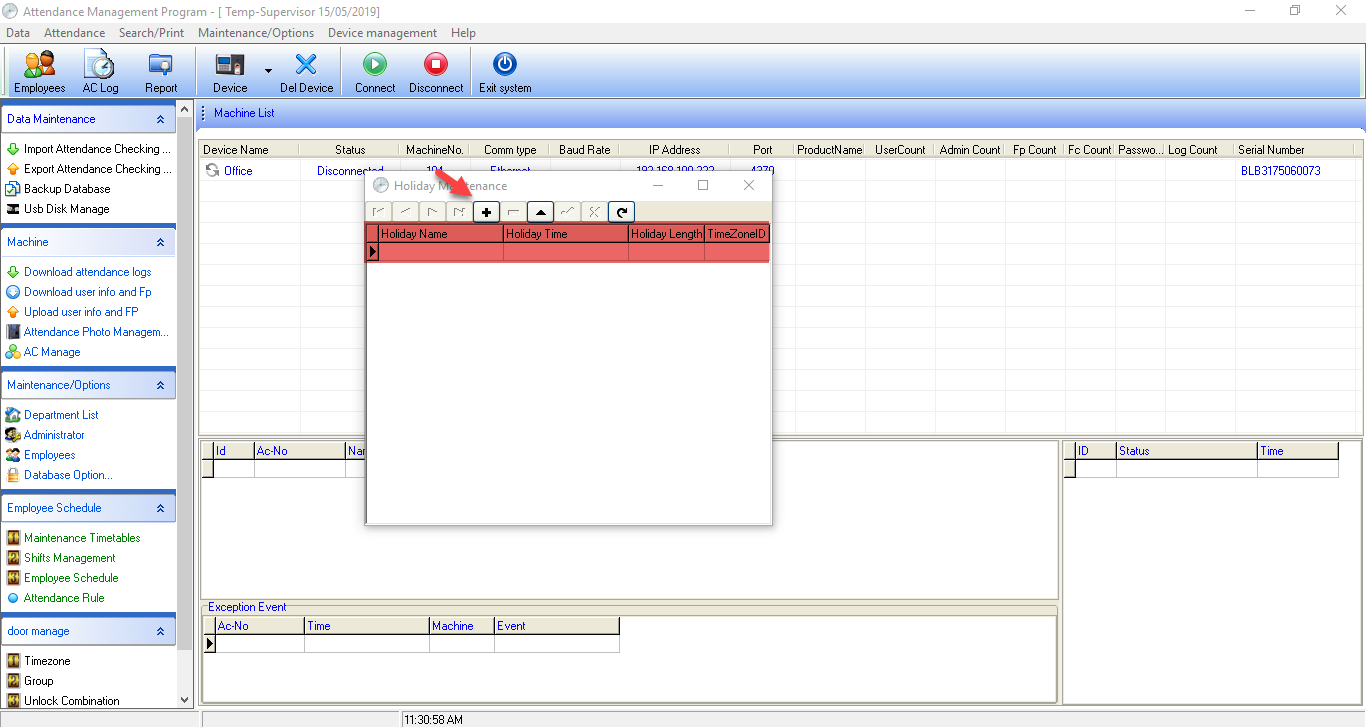
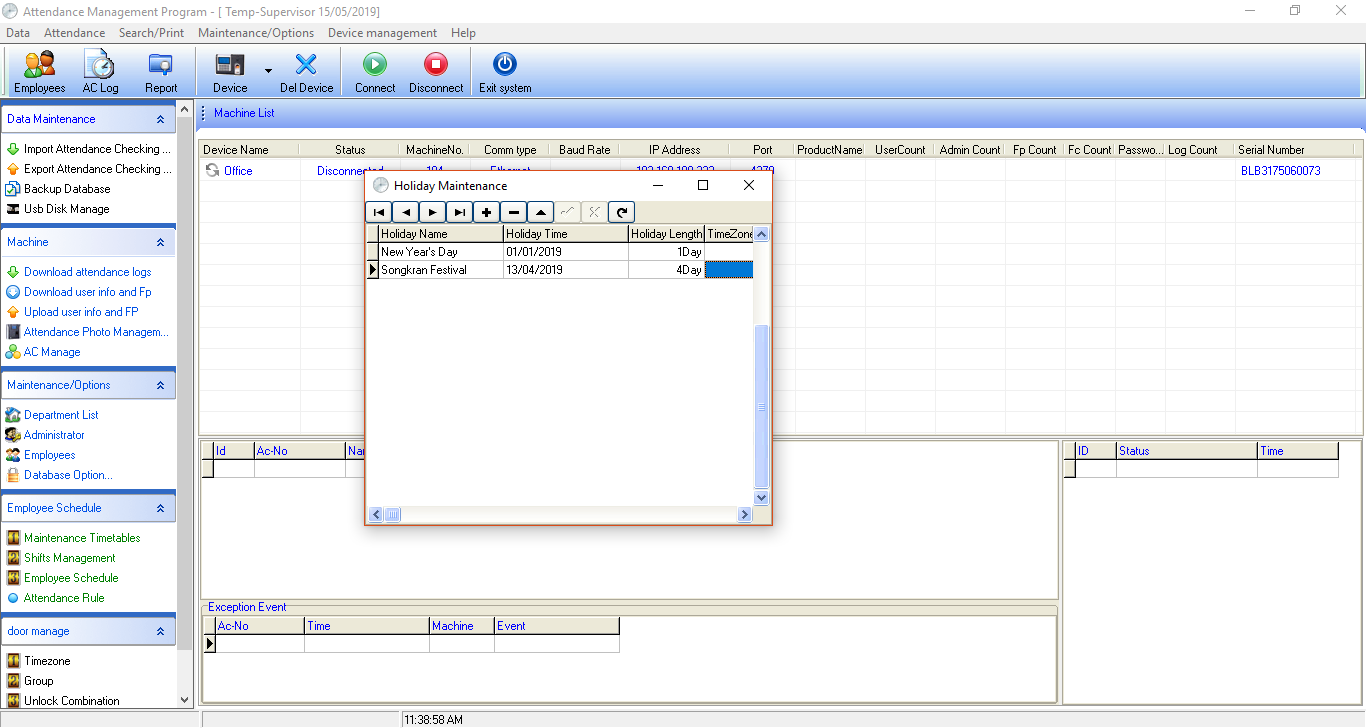
In the Holiday Name field, enter the holiday name, Holiday Time field, enter the holiday date, Holiday Length field, enter the number of holiday days. When finished
How to set up work schedule (work shifts)
Divided into 3 sections as follows
1.Maintenance Timetables (setting up work time periods)
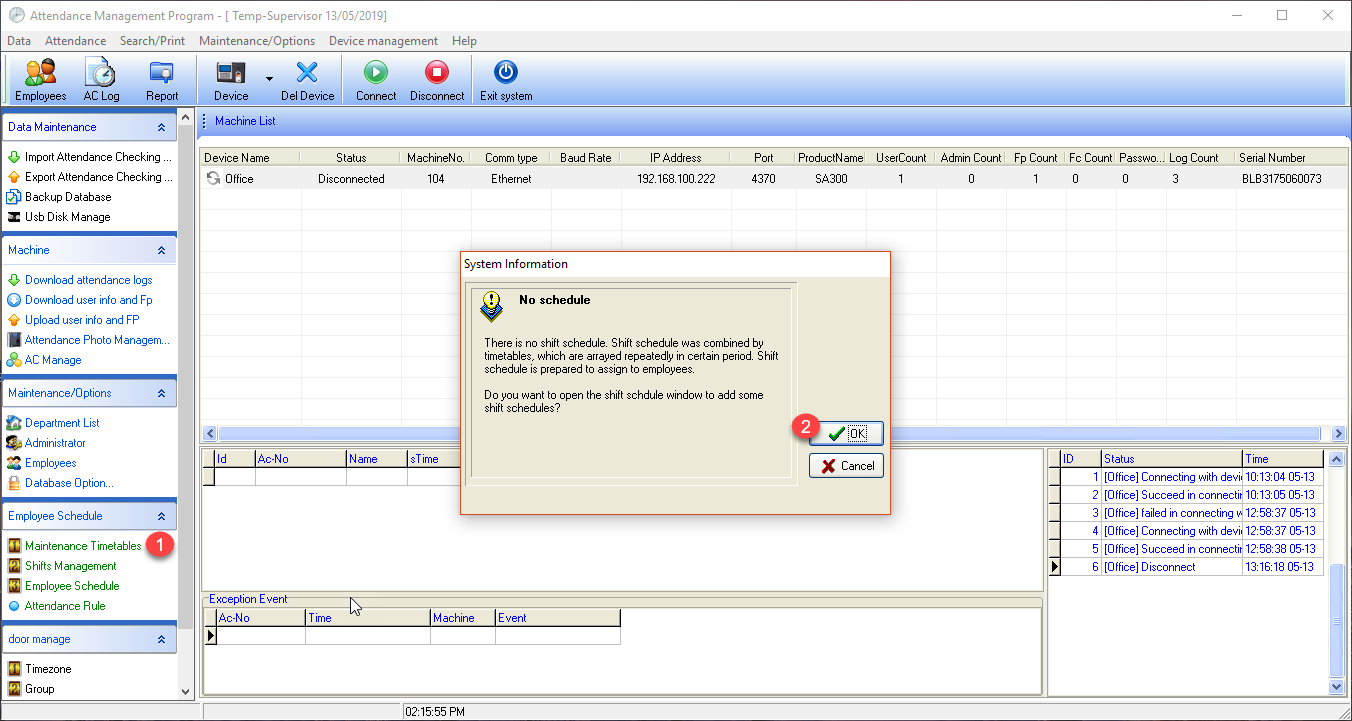
" If this is the first time setting up, the system will display 2 examples of schedule settings as shown in the image "
1.Time entry with 1 clock-in and 1 clock-out
2.Time entry with 2 clock-ins and 2 clock-outs
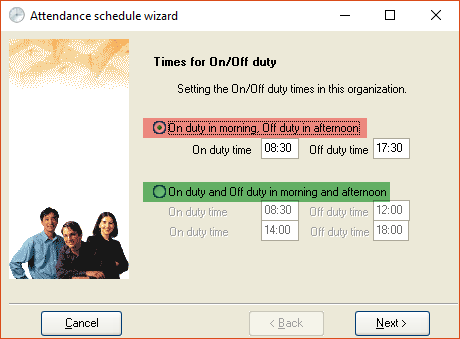
In this example, we will select the type with 1 clock-in and 1 clock-out
Next, the system will display clock-in and clock-out information
Example in the image: you can clock-in starting from 06:30 and clock-in closes at 11:30, and you can clock-out starting from 14:30 and clock-out closes at 23:30
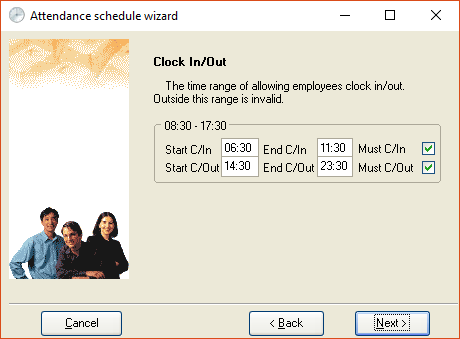
The system will notify the rules allowing employees to arrive late or leave early by how many minutes
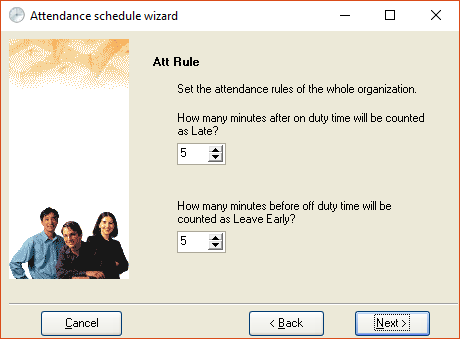
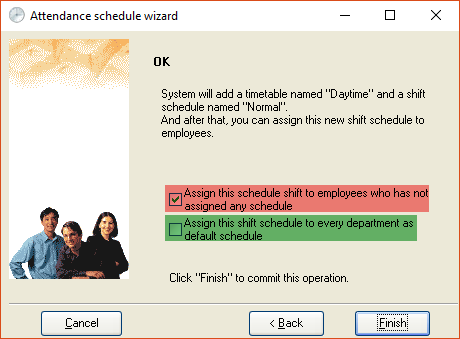
Next, the system will ask for the following details
1.Red box Do you want to use this schedule for all employees?
2.Green box Do you want to use this schedule for all departments?
After finishing the setup, the system will display the configuration information
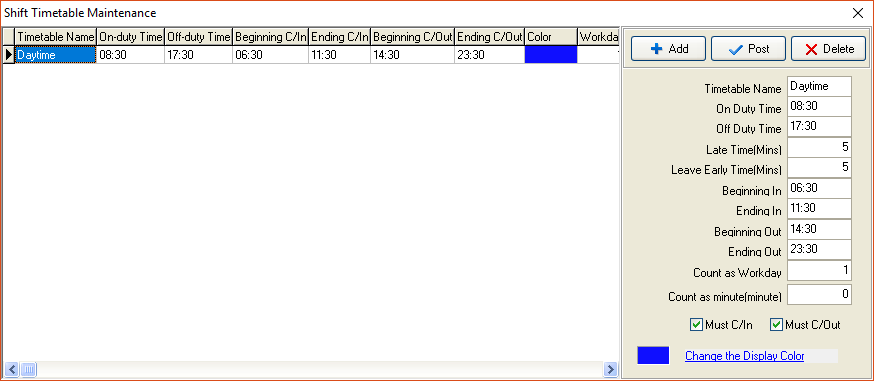
Once you have finished setting up the time, proceed to topic 2. Set time and date
2.Shifts Management (Set time and date)
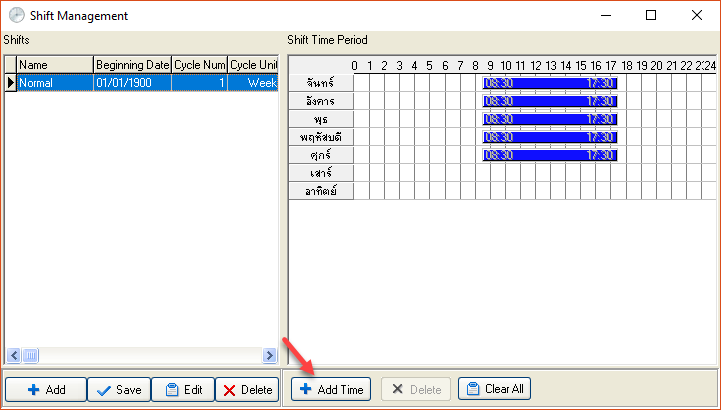
Example: want to change the date from the original working days Mon-Fri to Mon-Sat
Click the Add Time button to edit the information
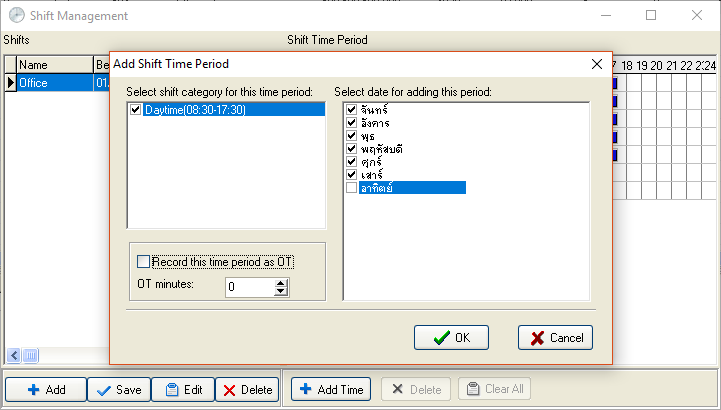
Select the work time period and date you want to edit, then click OK
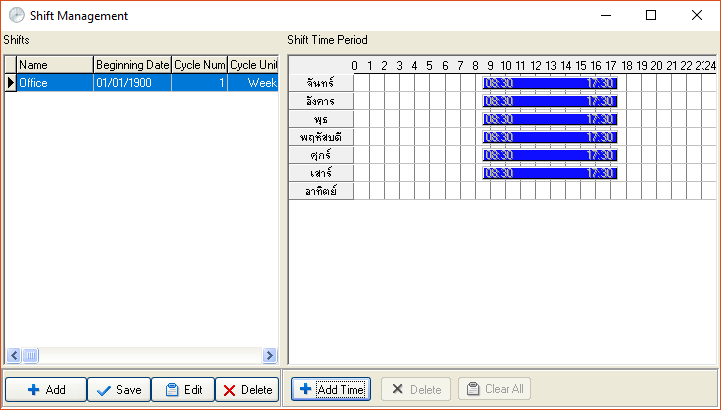
When the setup is complete, the system will display the configured information
Coming to the final topic, topic 3: Take the time + date information and assign it to employees
3.Employee schedule (Set employee work schedule)
Select the Employee schedule menu to set work schedules for employees
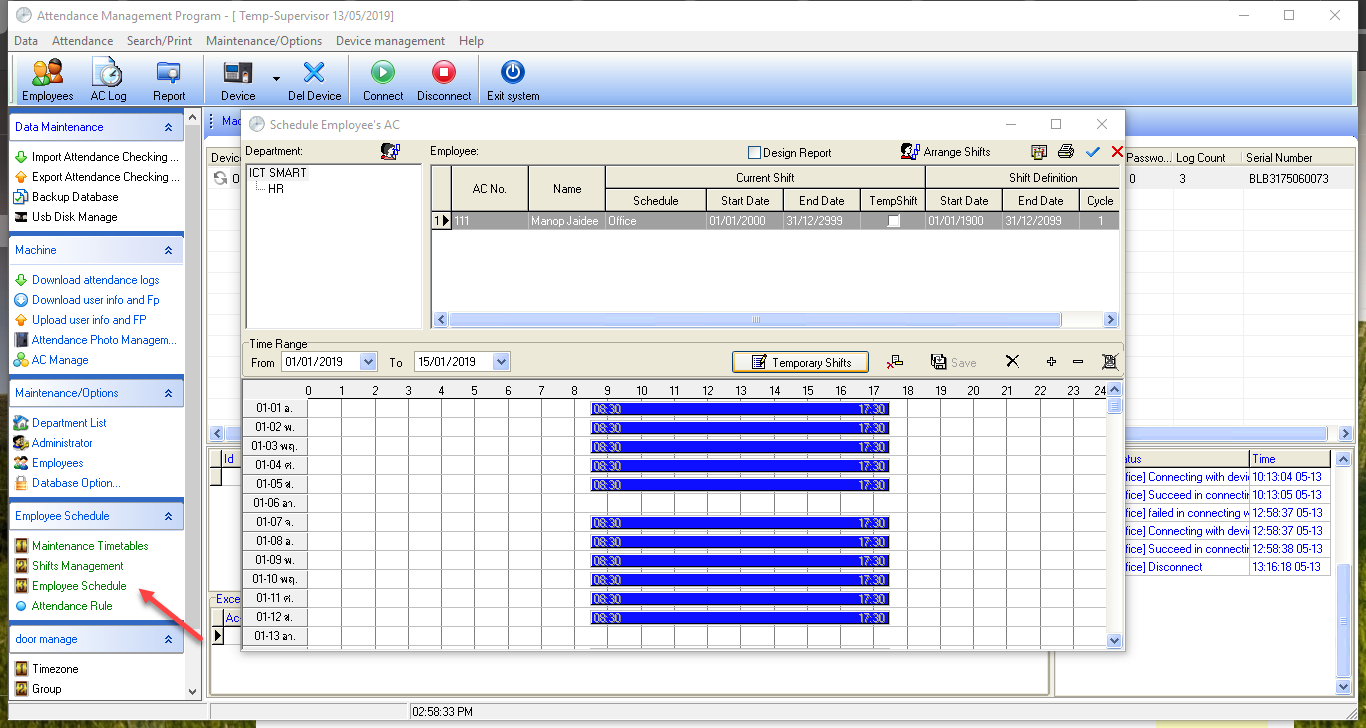
Select the employee you want to set a schedule for, then select Arrange Shifts
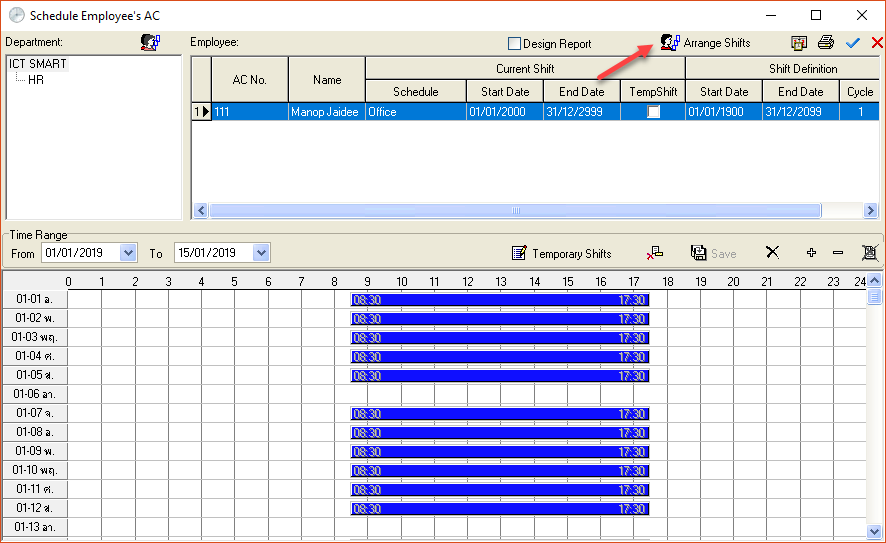
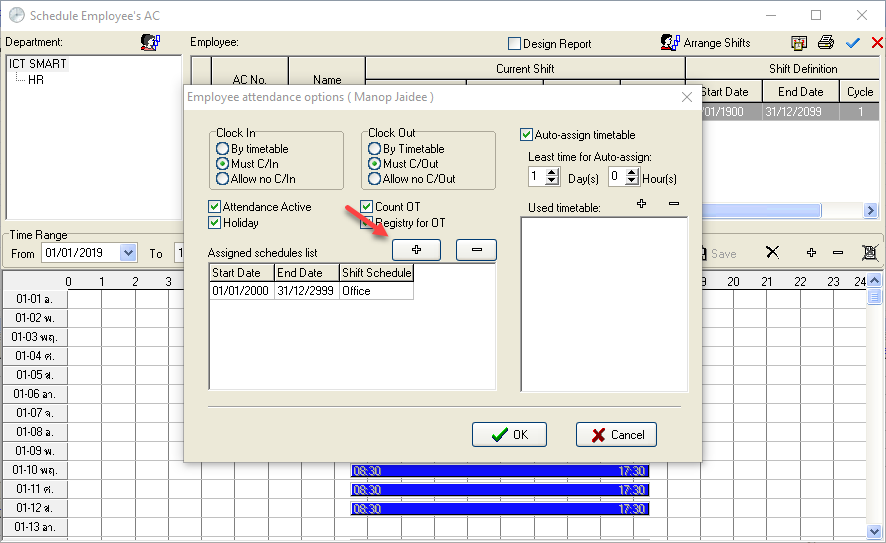
Click the + sign to add the employee's work schedule
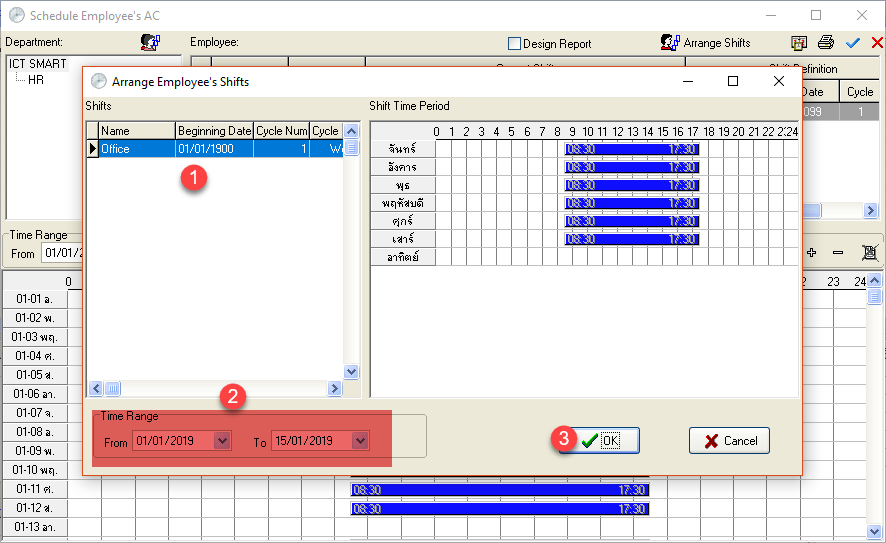
The system will display all available work schedules in the system
Note The topic in the red box is the time period for setting the employee's work schedule. For example, this employee's schedule is from 01/01/2019 to 15/01/2019
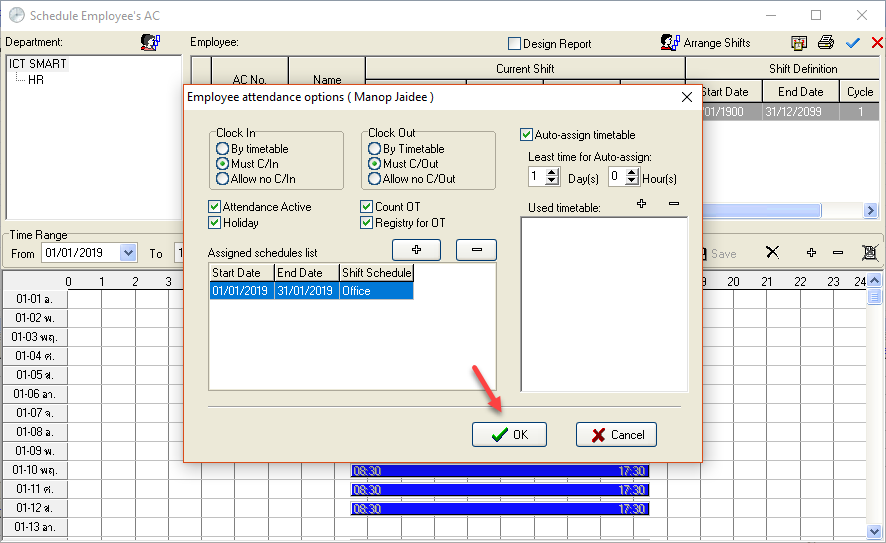
Once setup is complete, click the OK button to finish the employee work schedule setup process
Promotion for facial recognition scanner, fever detection, or detection of people not wearing face masks. Interested inquiries contact 02 726-7771-2 ext. 613 Mr. Natthavuth
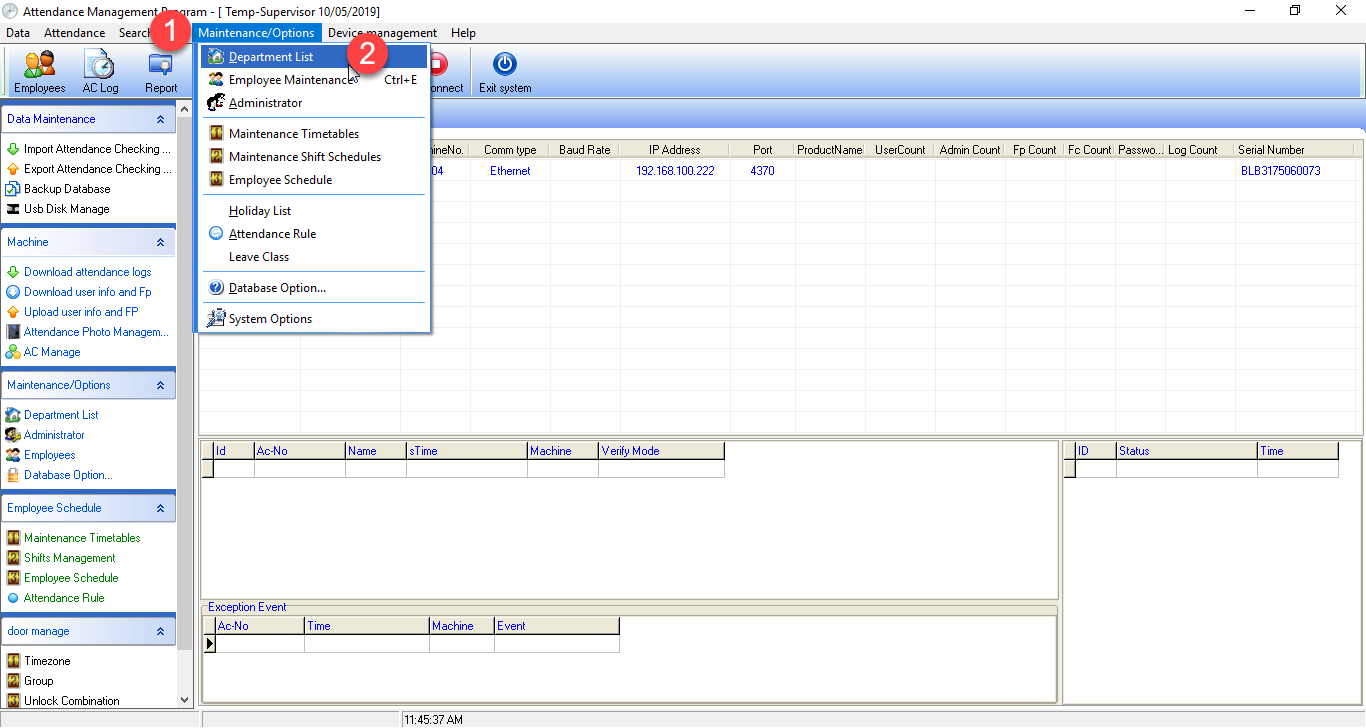
1. Select from the menu Maintemance/Options > Department List
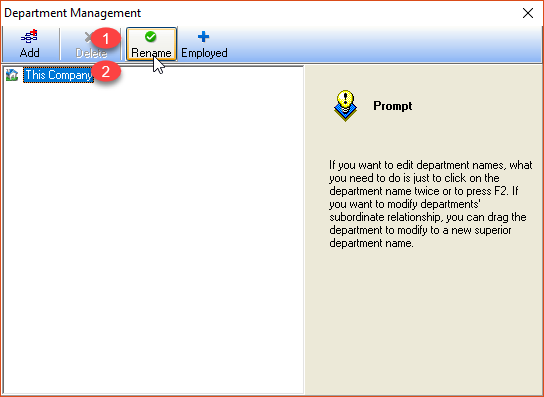
2. The program will display the Department Management menu page, click on the heading Our commany > and select Remane to change the company name
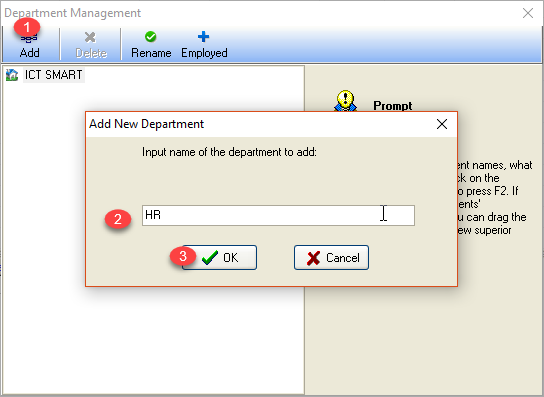
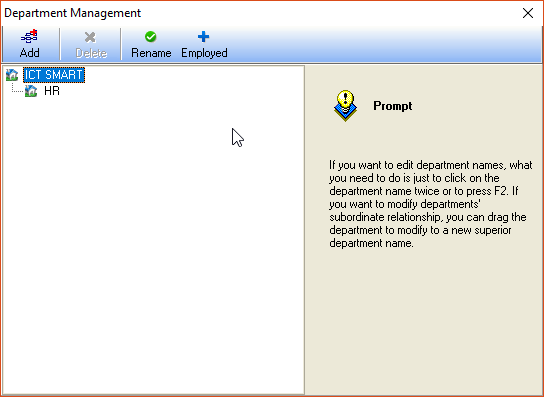
3. Enter the company name then click OK, then click Add to add a department
4. Go to the Employee menu to move the department of the user
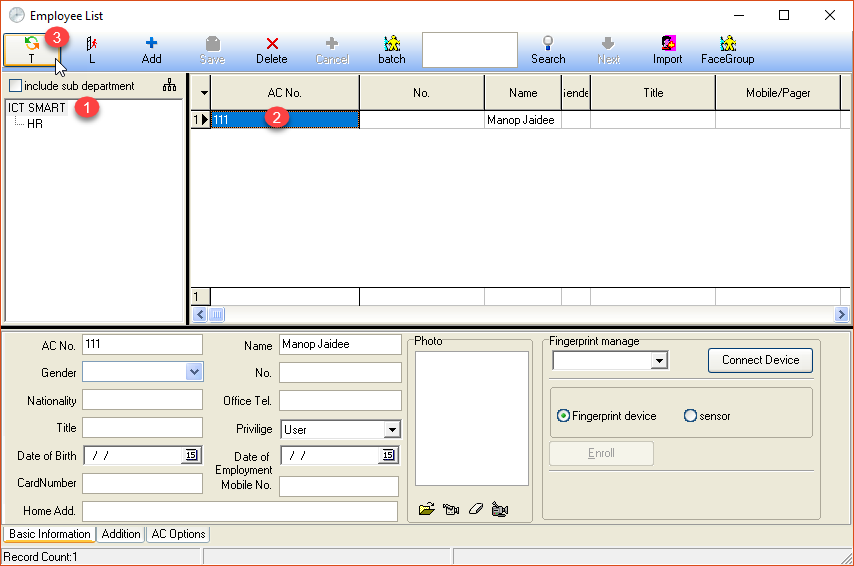
Department transfer window
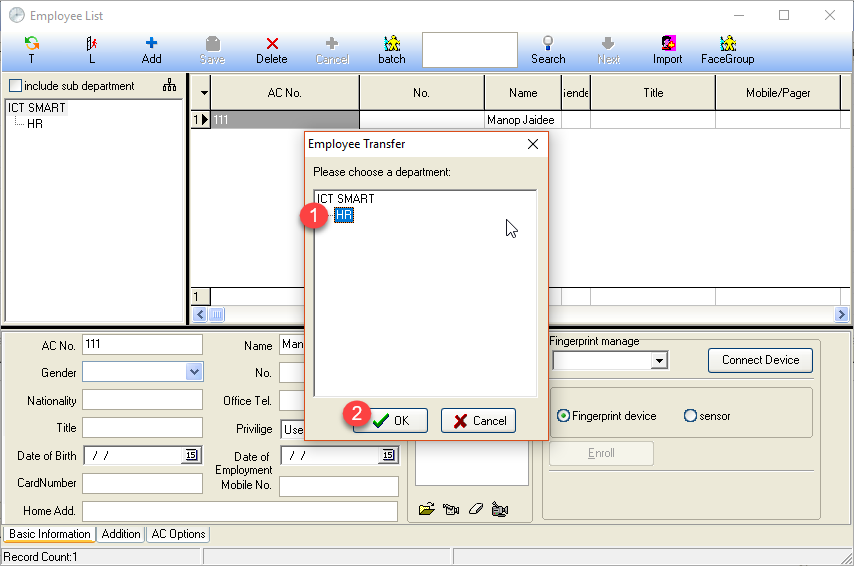
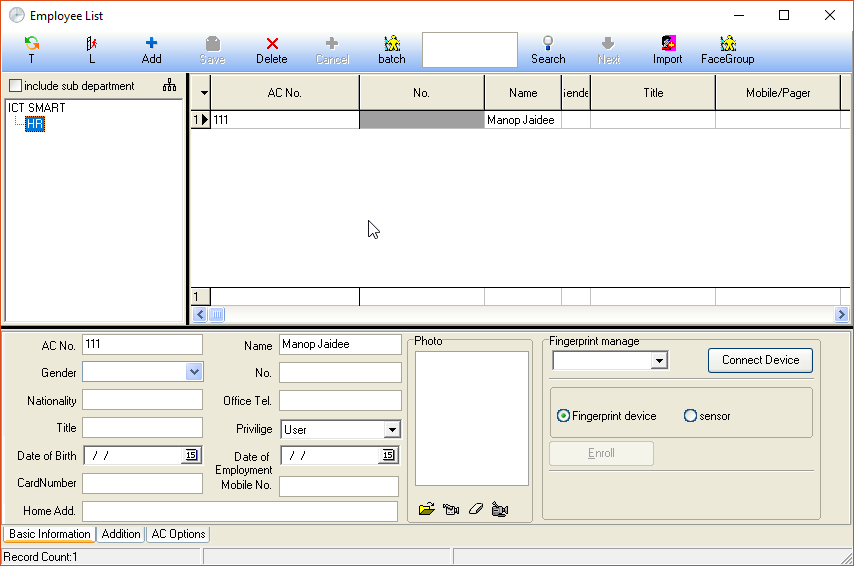
When you have selected the department, click the OK button
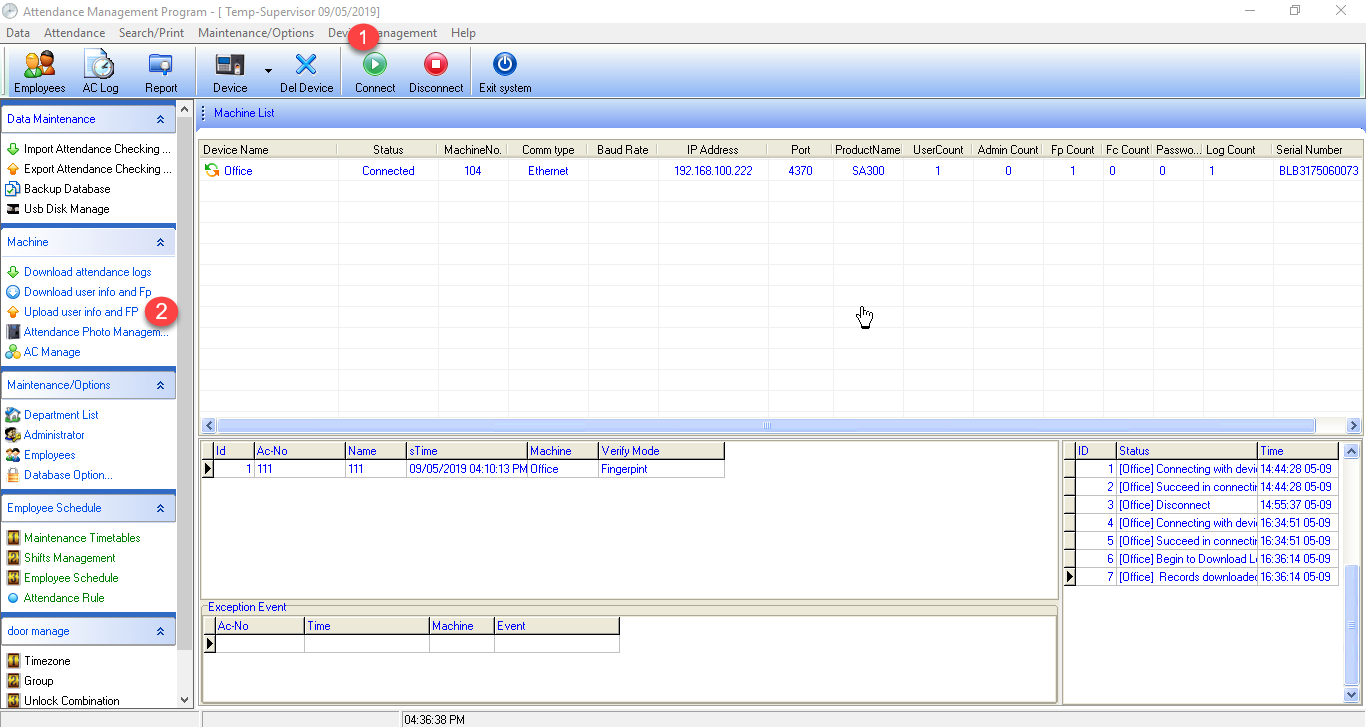
1. Click to connect the device. Connect if you can connect the scanner, a green and orange arrow will appear. When the device is connected, click the menu "Upload userinfo and FP"
2. Select from the company list (Our company) and then select the user ID you want to send to the scanner **Don't forget to check the checkmark in front of the Fingerprint section to send the employee's fingerprints, then click the Upload button to send the data
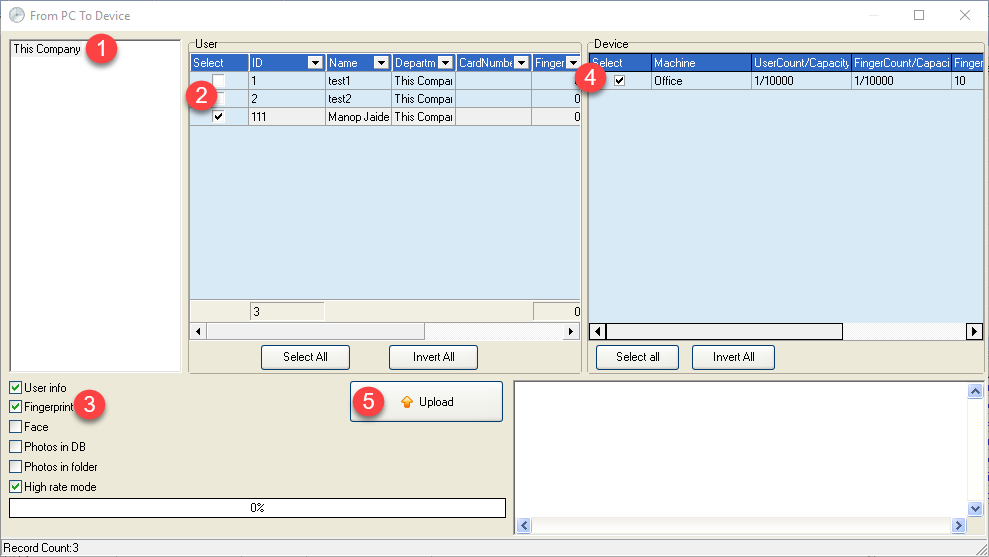
3. Data sent successfully
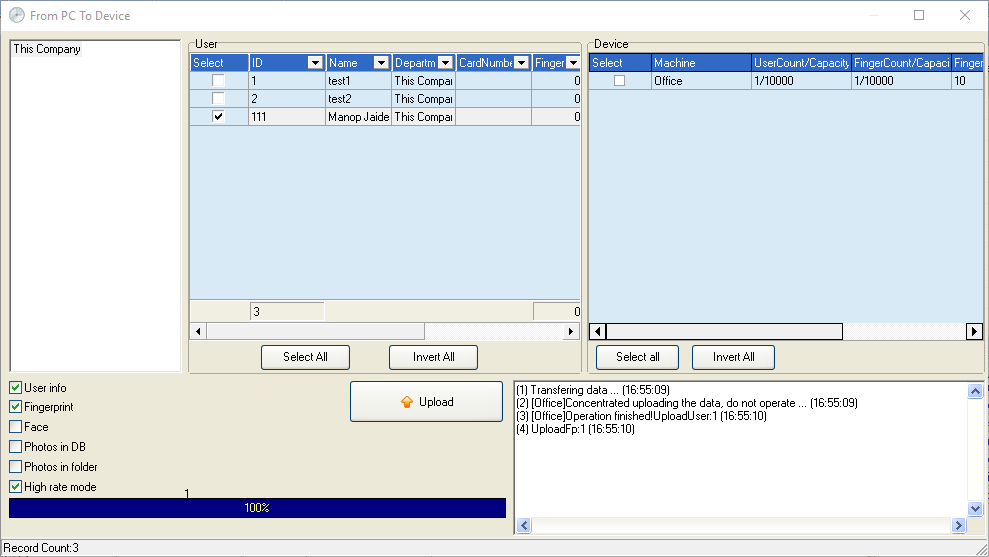
How to Download data from the scanner
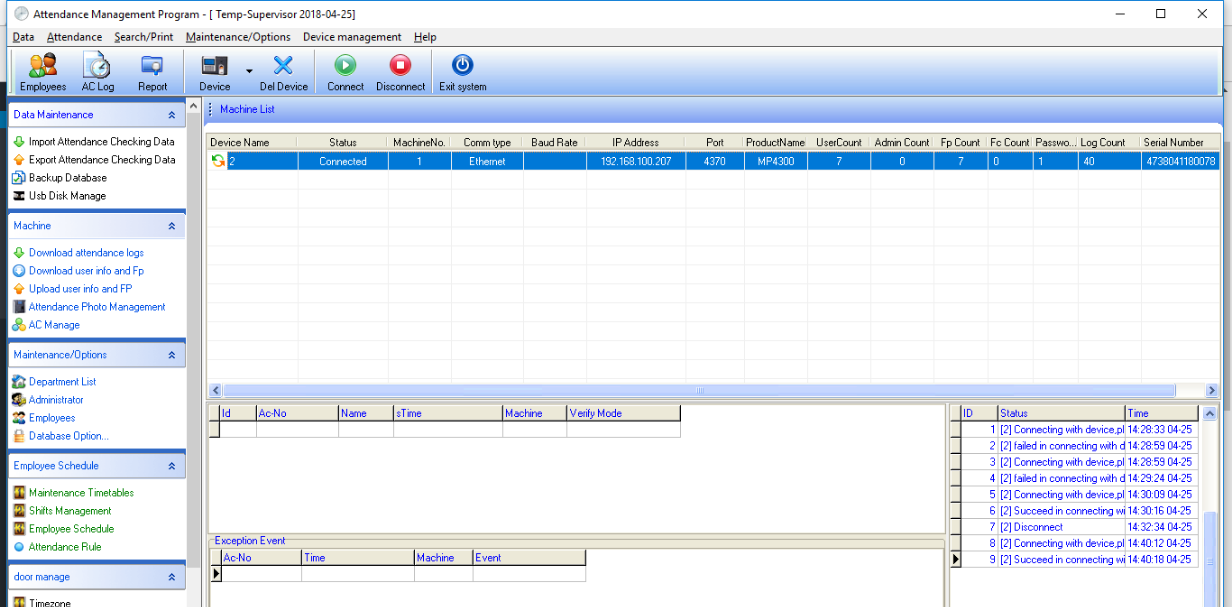
1.Connect the scanner by pressing the Connect menu to connect the device. If the device is connected successfully, you will notice an orange/green arrow symbol
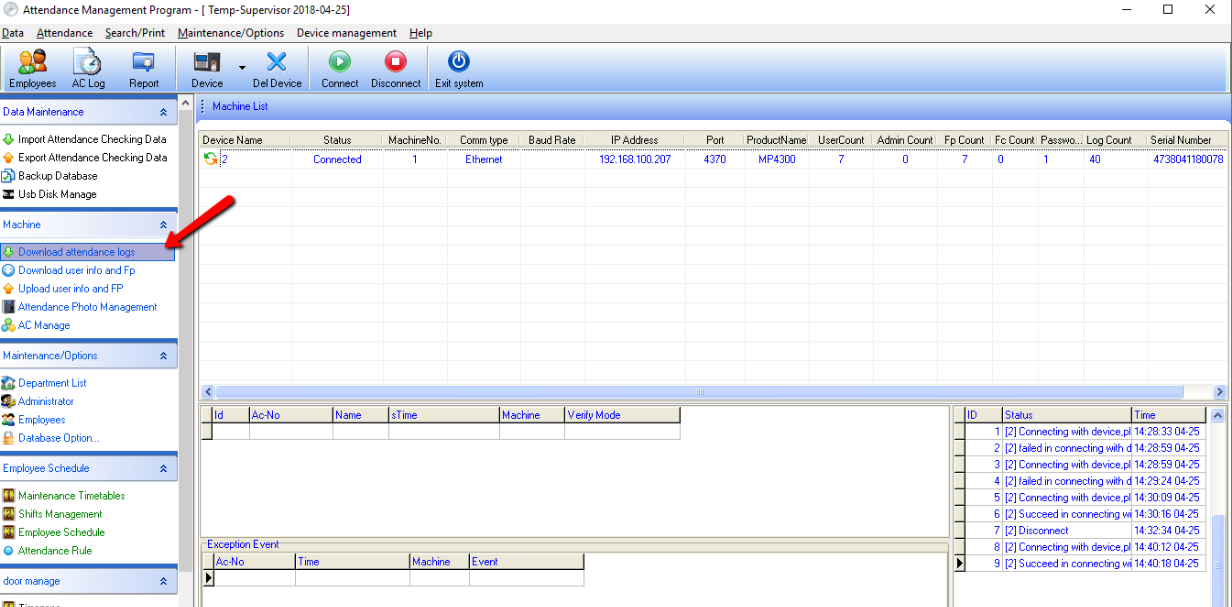
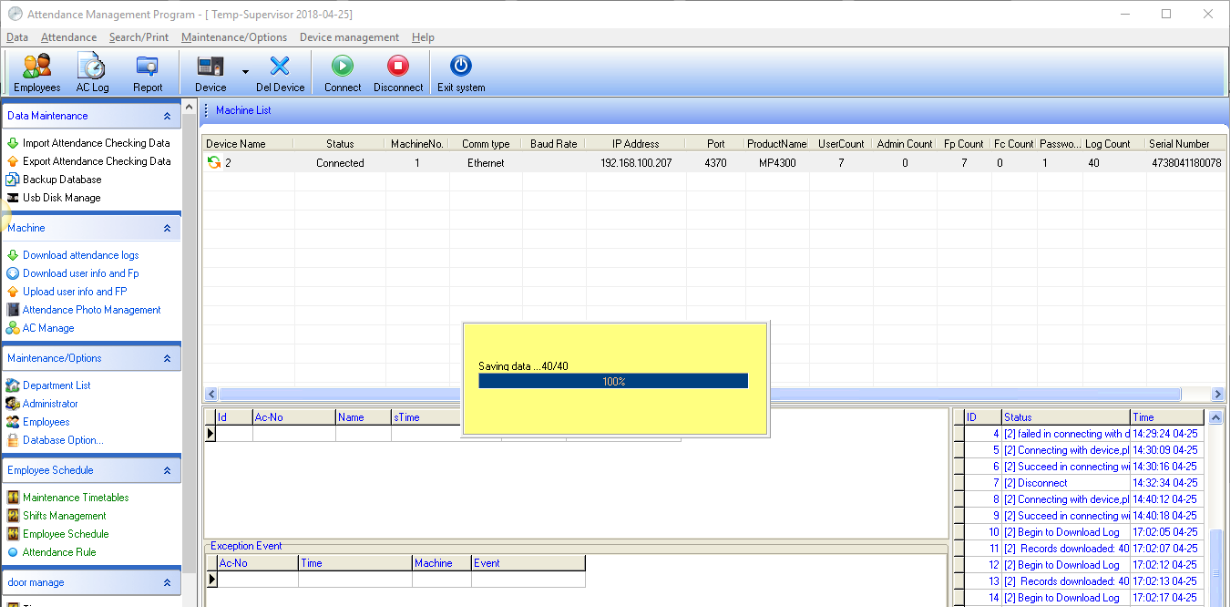
2.Select the "Download Attendance Log" menu to retrieve data from the scanner
3.The system will display the amount of data in the device and the percentage of data retrieval
How to Set Time on Fingerprint Scanner Device via Software
1. Click the Connect menu to connect the device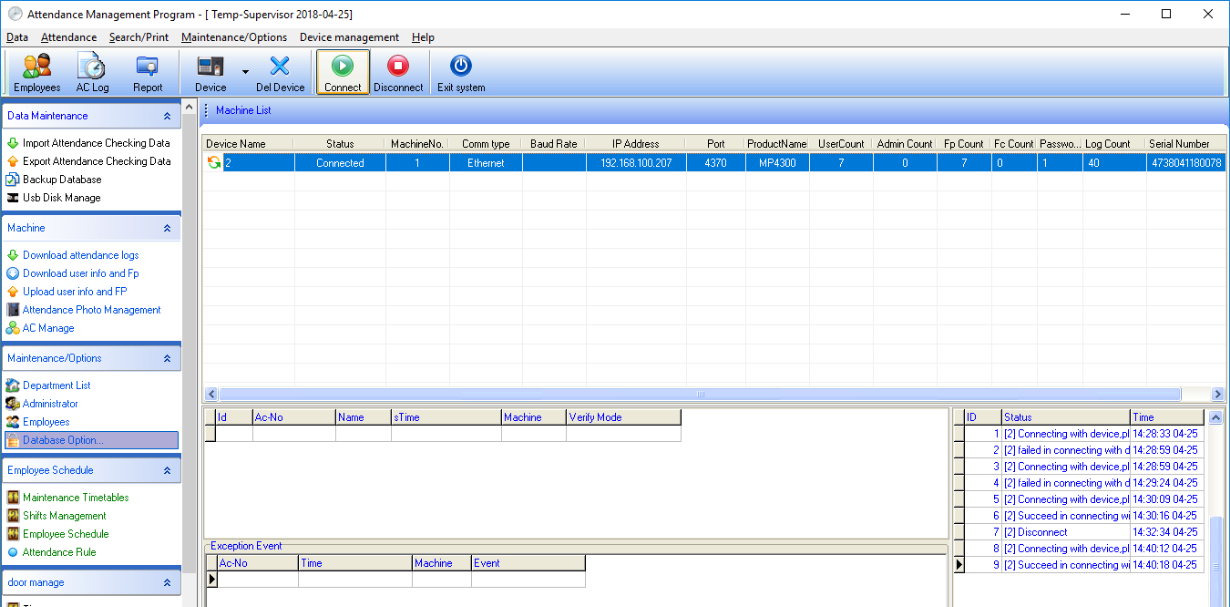
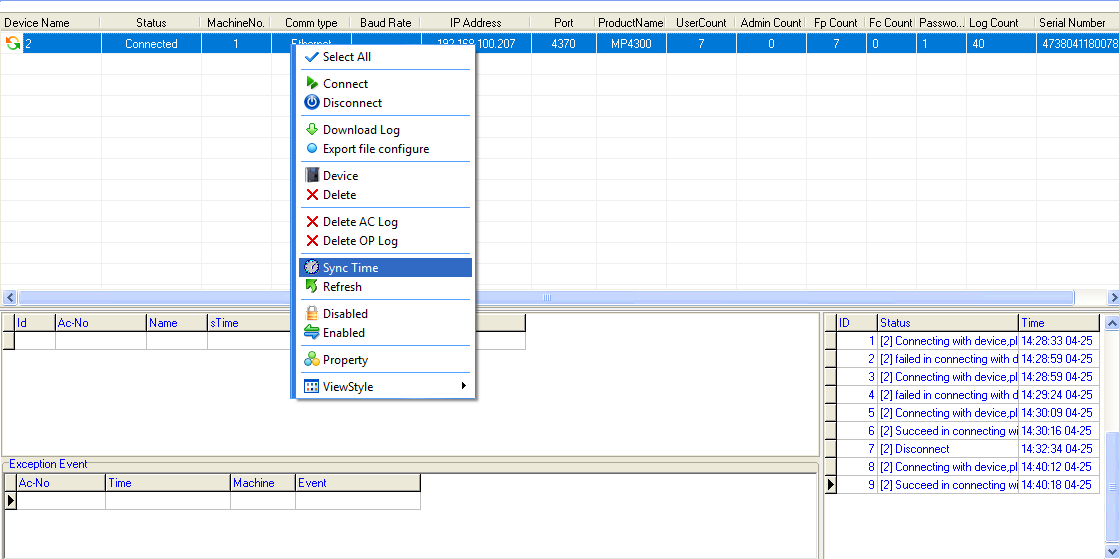
2. Right-click on the device list and select the Sync Time option to set the time
How to Delete Log Data When Device Storage is Full
Note: First, you must retrieve the latest data and save it to the program before proceeding.
1. Connect the device

2. Right-click and select Delete AC Log (Note: AC Log is the data scanned by employees)

3. Then select Delete OP Log (Note: OP Log is the data of accessing the menu on the scanning device)

How to set up Date and Time Format to support the ZK Attendance Manager program
1.Select the Control Panel menu and then select the Region menu
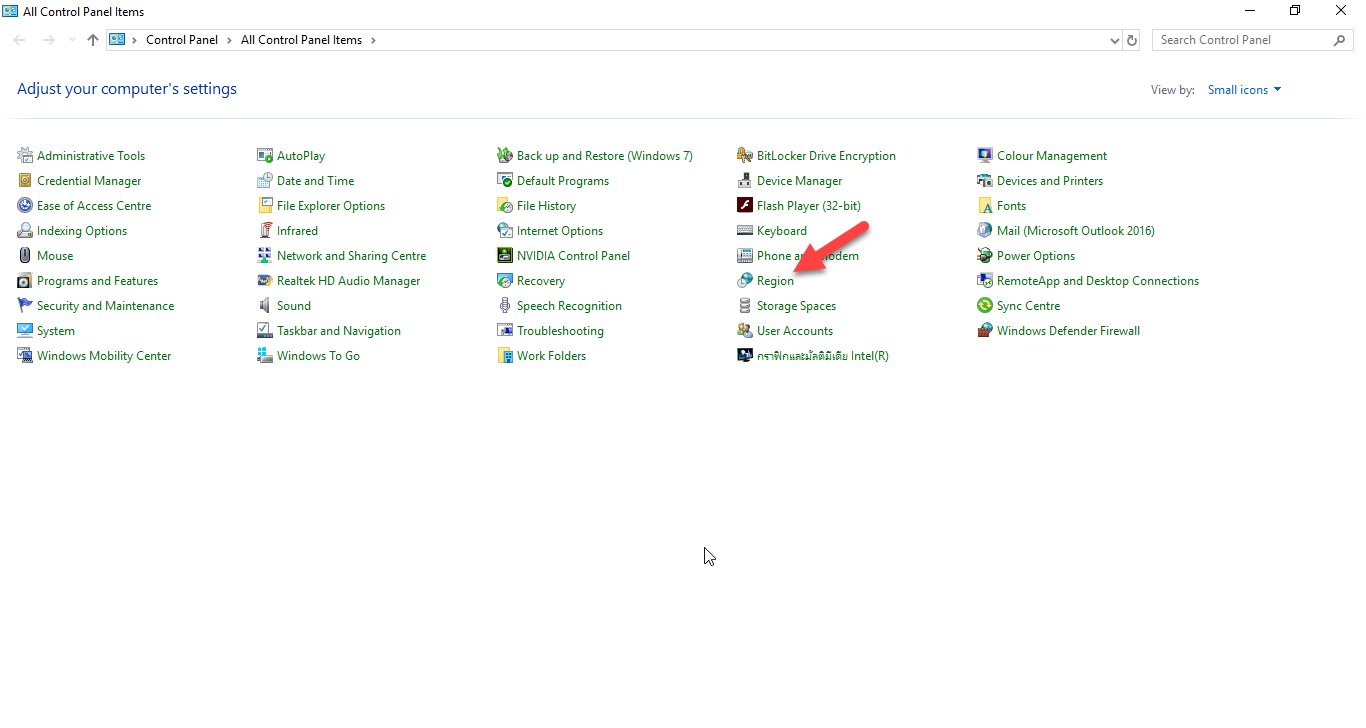
2.Select the Additional Settings option
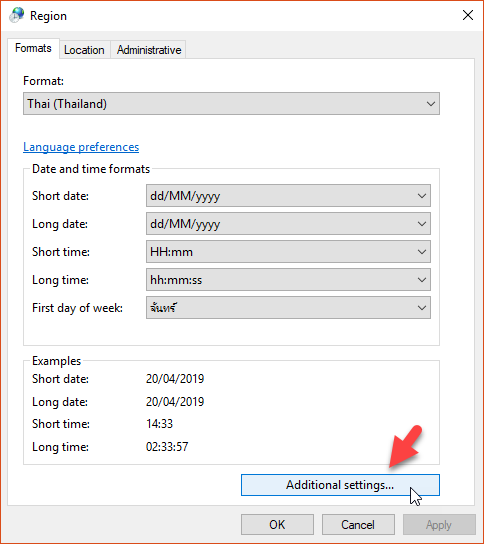
3.Select the Date option to set the Date Format. The date system that the Software can support is the Gregorian calendar
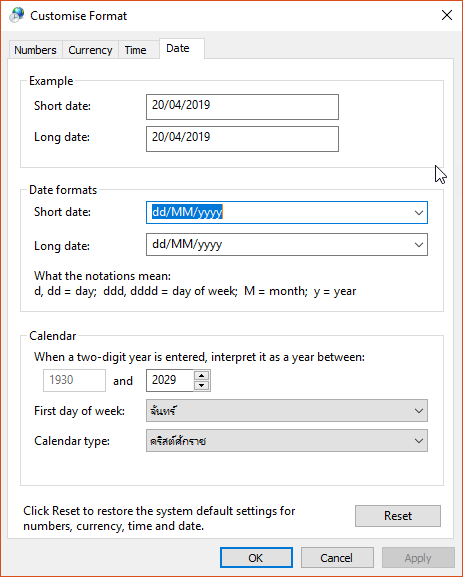
Short date use dd/MM/yyyy
Long date use dd/MM/yyyy
Calendar type select Gregorian calendar
When the settings are complete, click the OK button
4.Select the Time option to set the time format
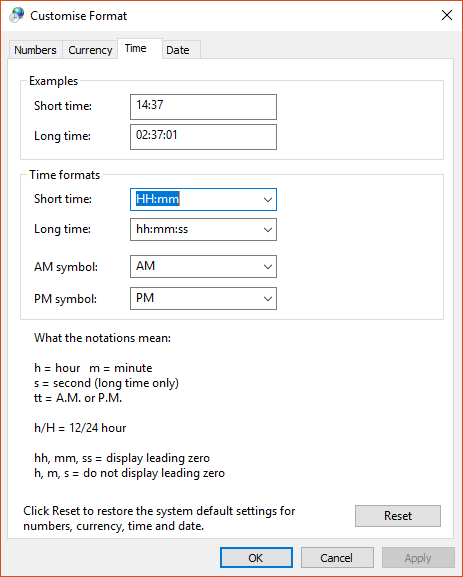
Short Time enter HH:mm
Then click the OK button
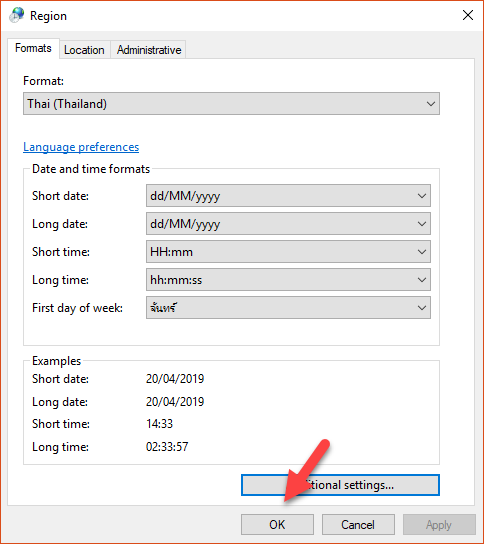
5.When the editing is complete, click the OK button again on the Region menu page
How to Select Database
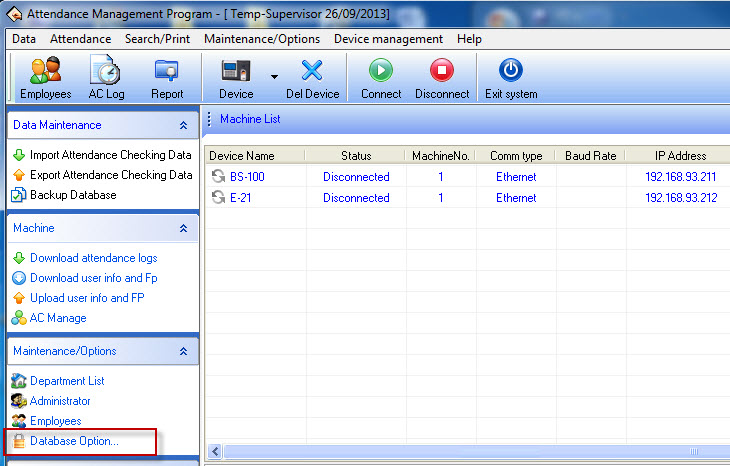
1.When you open the program, select Database Option…
2.Click on the ellipsis to select the database storage location
After selecting the database, click Test Connection to test the connection
(Default Program will be located at C:\Program Files\Att2008\att2000.mdb)
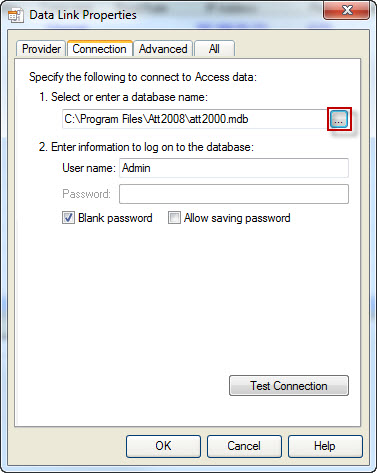
Then click OK to complete the database selection process